- A+
所属分类:服务器
修改服务器NUMA需重启服务器生效
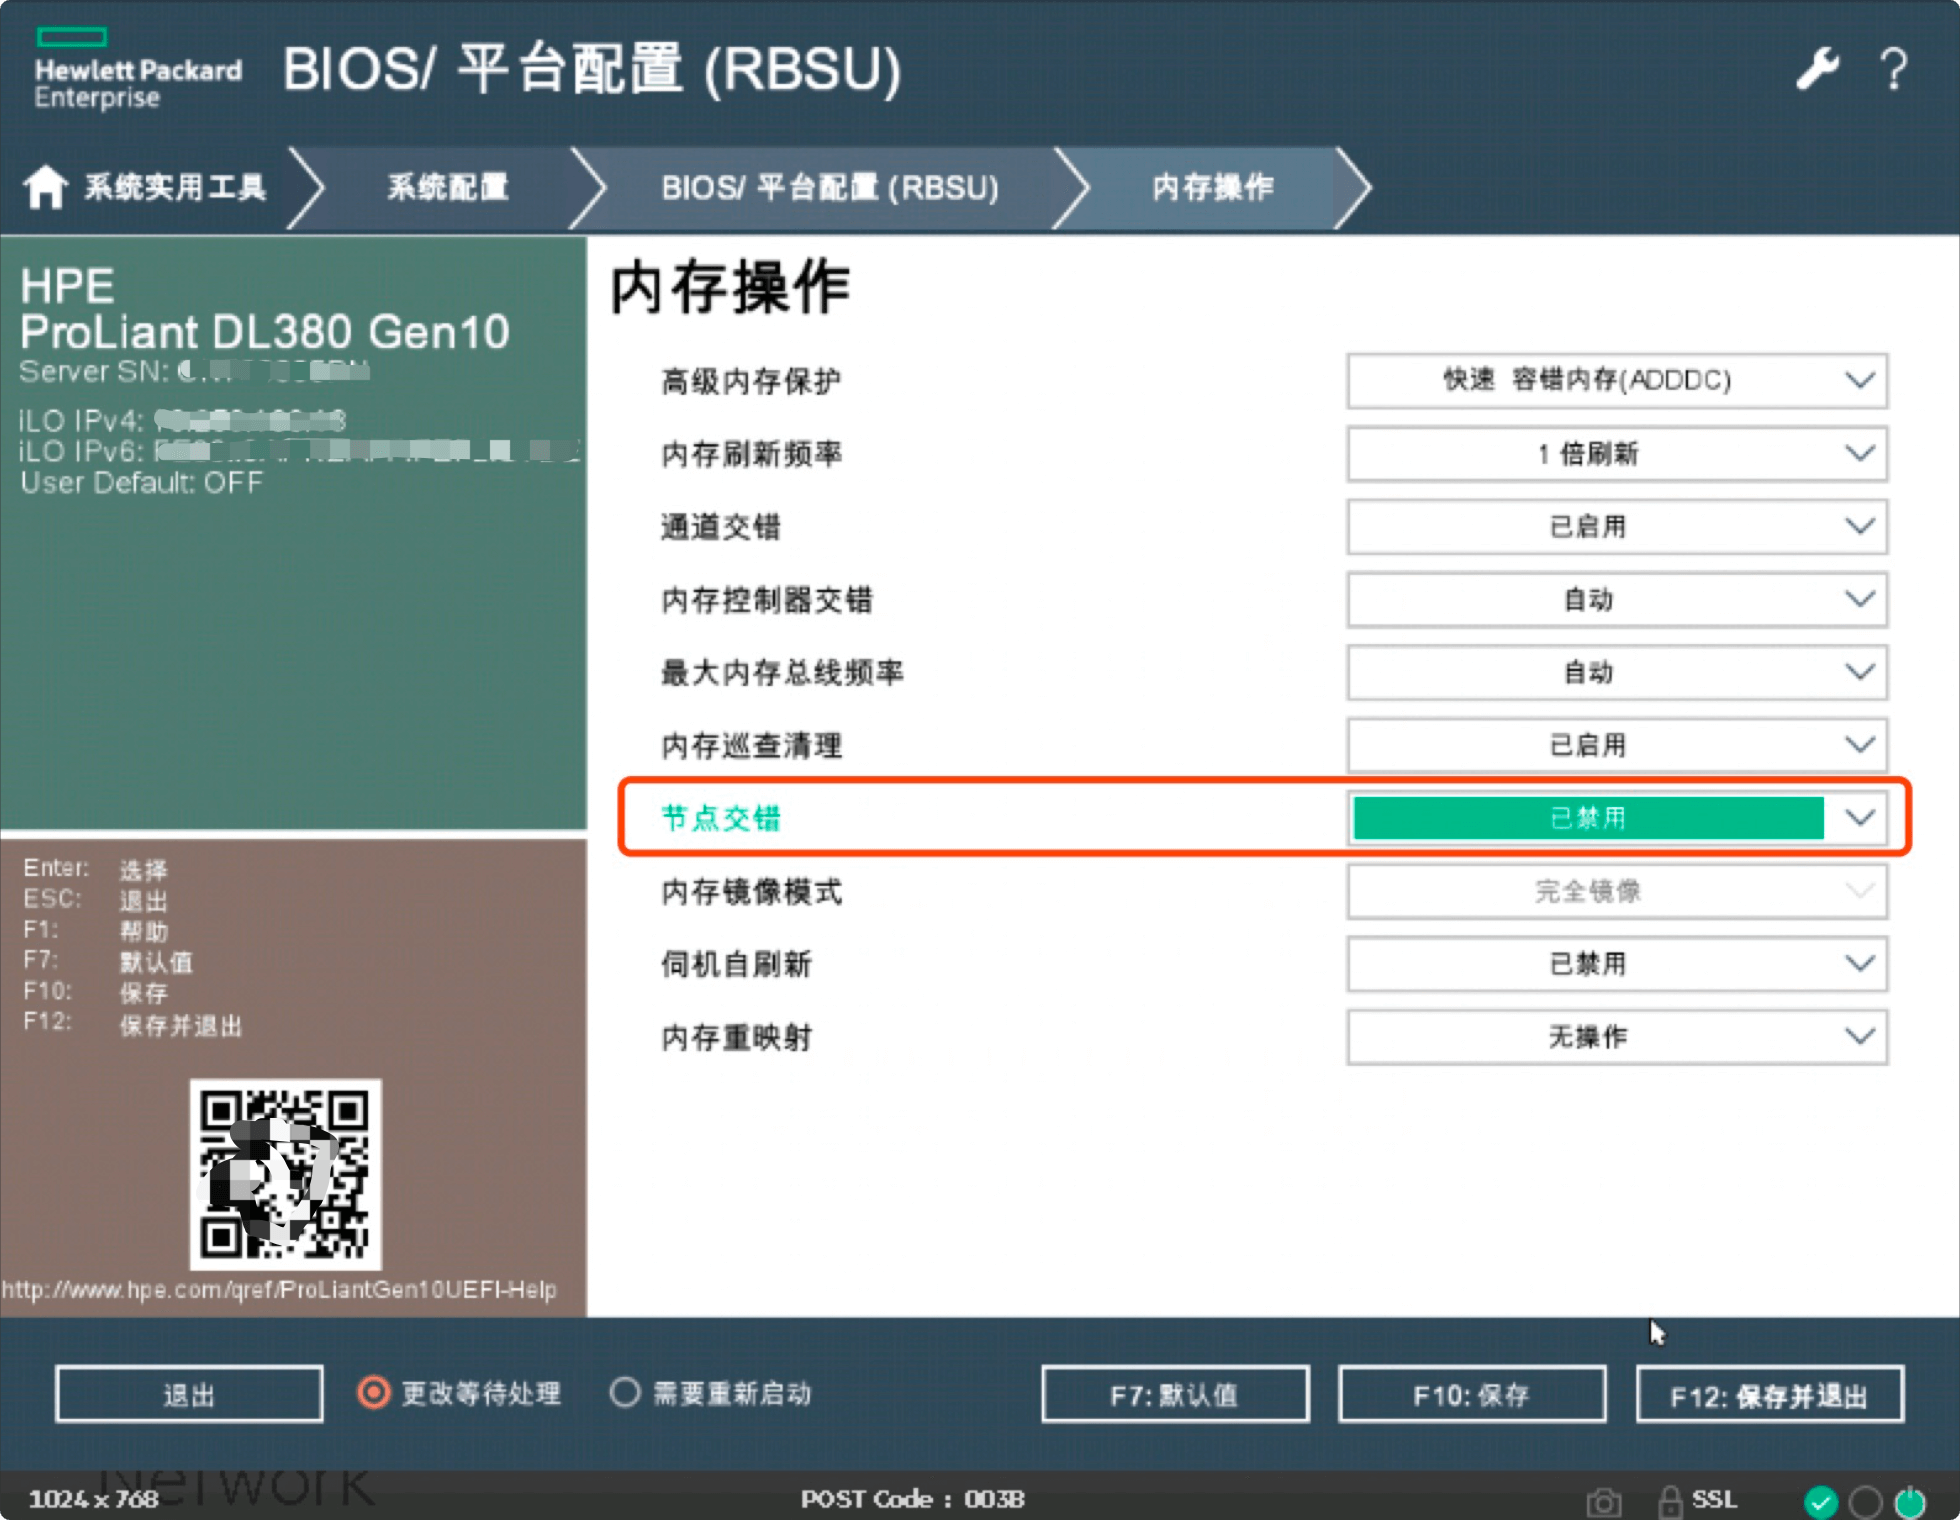
第一步:内存选项中禁用节点交错(开启HPE服务器numa平衡需要禁用内存选项中节点交错功能):
解释:可以使用Node Interleaving(节点交错)选项启用或禁用NUMA节点交错,通常,可以禁用该选项以在NUMA节点上获得最佳性能,启用该选项后内存地址,内存地址将交错分散在为每个处理器安装的内存之间,某些工作负载可能会提高性能
1.过程:System Utilities 屏幕中,选择 System Configuration(系统配置) -> BiOS/Platform Configuration(RBSU)(BIOS/平台配置(RBSU)) -> Memory Options(内存选项) -> Node Interleaving(节点交错)
2.如下选择一个配置
- Enabled(已启用) -- 内存地址将交错分布在为每个每个处理器安装的内存之间,所有节点必须具有相同的内存大小,系统性能可能会收到影响。
- Disabled(已禁用) -- 禁用节点交错,在大多数环境中可达到最佳性能。
界面如下:

也可以使用命令操作
ilorest方式:
- #查看:
- ilorest get NodeInterleaving --selector=Bios. -u admin -p xxxxxx --url=10.x.x.x
- #开启:
- ilorest set NodeInterleaving=Enabled --selector=Bios. -u admin -p xxxxxx --url=10.x.x.x
- #关闭:
- ilorest set NodeInterleaving=Disabled --selector=Bios. --commit -u admin -p xxxxxx --url=10.x.x.x
redfish方式:
- #查看:
- curl -s -X GET -k -H 'Content-Type: application/json' https://10.x.x.x/redfish/v1/systems/1/bios/settings/ -u admin:xxxxxx --insecure | json_reformat |grep -i 'NodeInterleaving'
- #开启:
- curl -X PATCH -k -H 'Content-Type: application/json' -i https://10.x.x.x/redfish/v1/systems/1/bios/settings/ --data '{"Attributes": {"NodeInterleaving":"Enabled"}}' -u admin:xxxxxx --insecure
- #关闭:
- curl -X PATCH -k -H 'Content-Type: application/json' -i https://10.x.x.x/redfish/v1/systems/1/bios/settings/ --data '{"Attributes": {"NodeInterleaving":"Disabled"}}' -u admin:xxxxxx --insecure

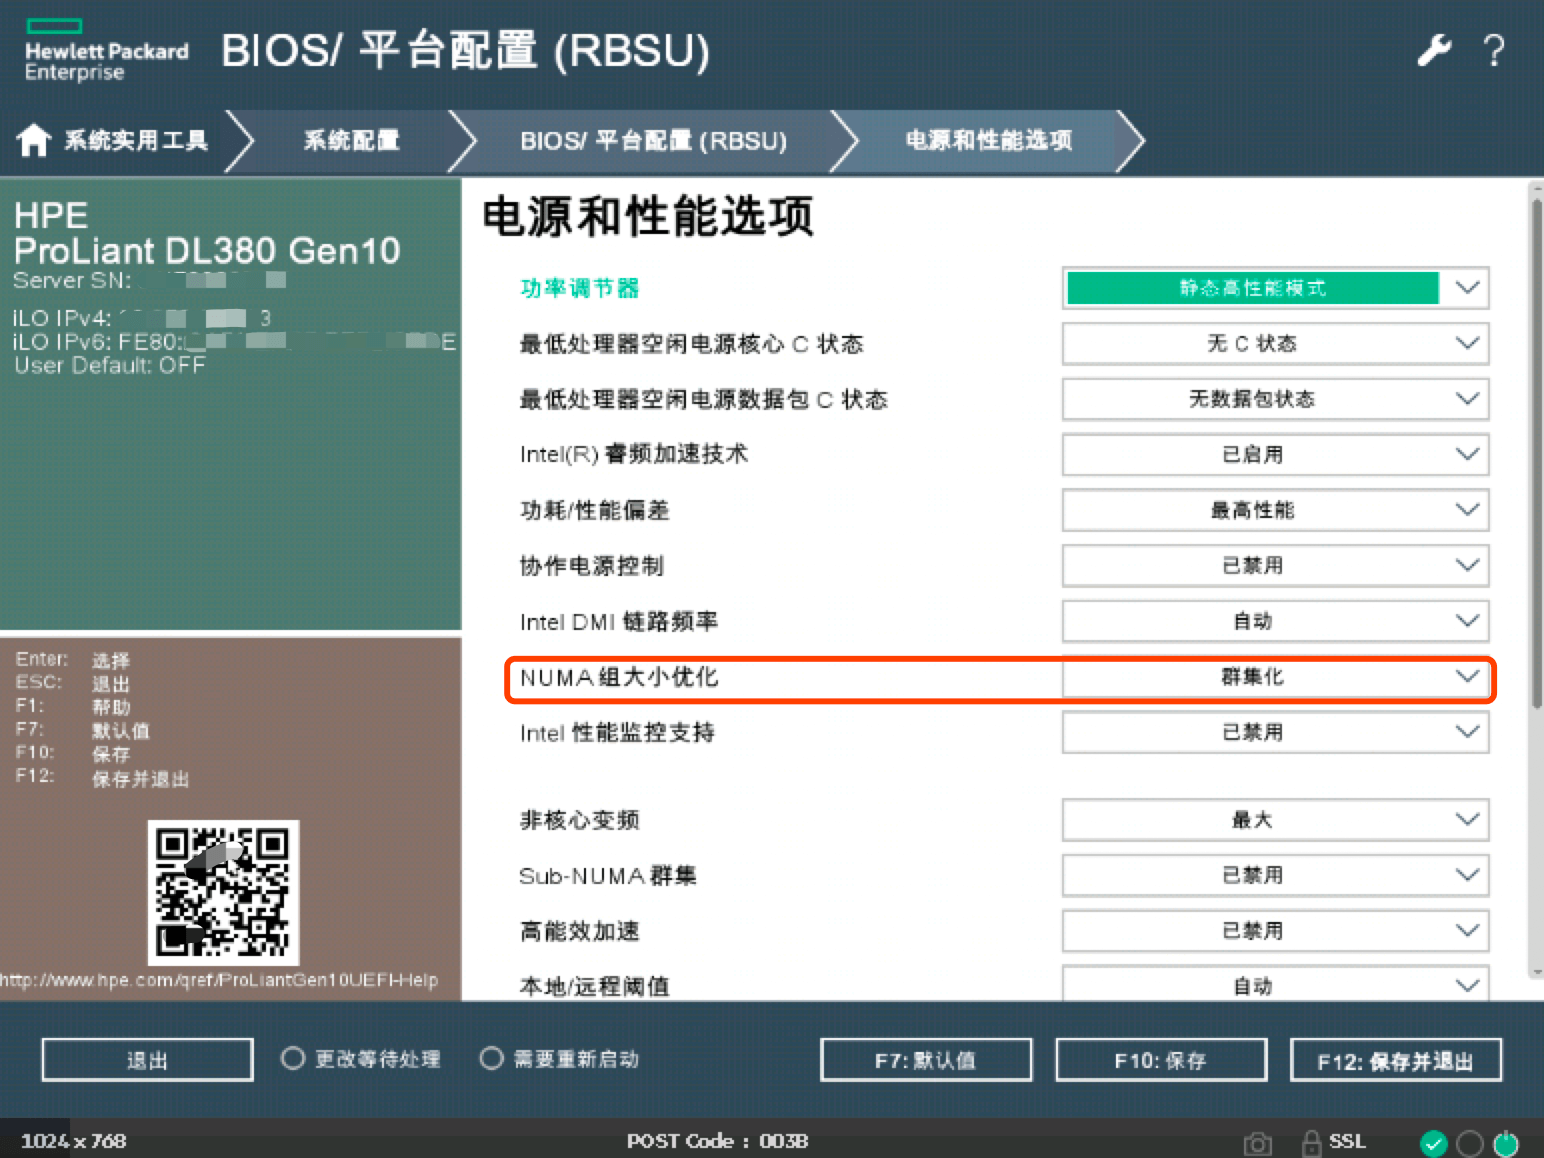
BiOS界面调试:

也可以使用命令操作(查看CPU槽位NUMA是否开启:没有关闭,只有 Clustered 和 Flat选项)
ilorest方式:
- #查看当前设置模式:
- ilorest get NumaGroupSizeOpt --selector=Bios. -u admin -p xxxxxx --url=10.x.x.x
- #设置为群集模式:
- ilorest set NumaGroupSizeOpt=Clustered --selector=Bios. --commit -u xxxxx -p xxxxx --url=10.x.x.x
- #设置为扁平模式:
- ilorest set NumaGroupSizeOpt=Flat --selector=Bios. --commit -u xxxxx -p xxxxx --url=10.x.x.x
redfish方式:
- #查看当前设置模式:
- curl -s -X GET -k -H 'Content-Type: application/json' https://10.x.x.x/redfish/v1/systems/1/bios/settings/ -u admin:xxxxxx --insecure | json_reformat |grep -w 'NumaGroupSizeOpt'
- #设置为群集模式:
- curl -X PATCH -k -H 'Content-Type: application/json' -i https://10.x.x.x/redfish/v1/systems/1/bios/settings/ --data '{"Attributes": {"NumaGroupSizeOpt":"Clustered"}}' -u admin:xxxxxx --insecure
- #设置为扁平模式:
- curl -X PATCH -k -H 'Content-Type: application/json' -i https://10.x.x.x/redfish/v1/systems/1/bios/settings/ --data '{"Attributes": {"NumaGroupSizeOpt":"Flat"}}' -u admin:xxxxxx --insecure
---
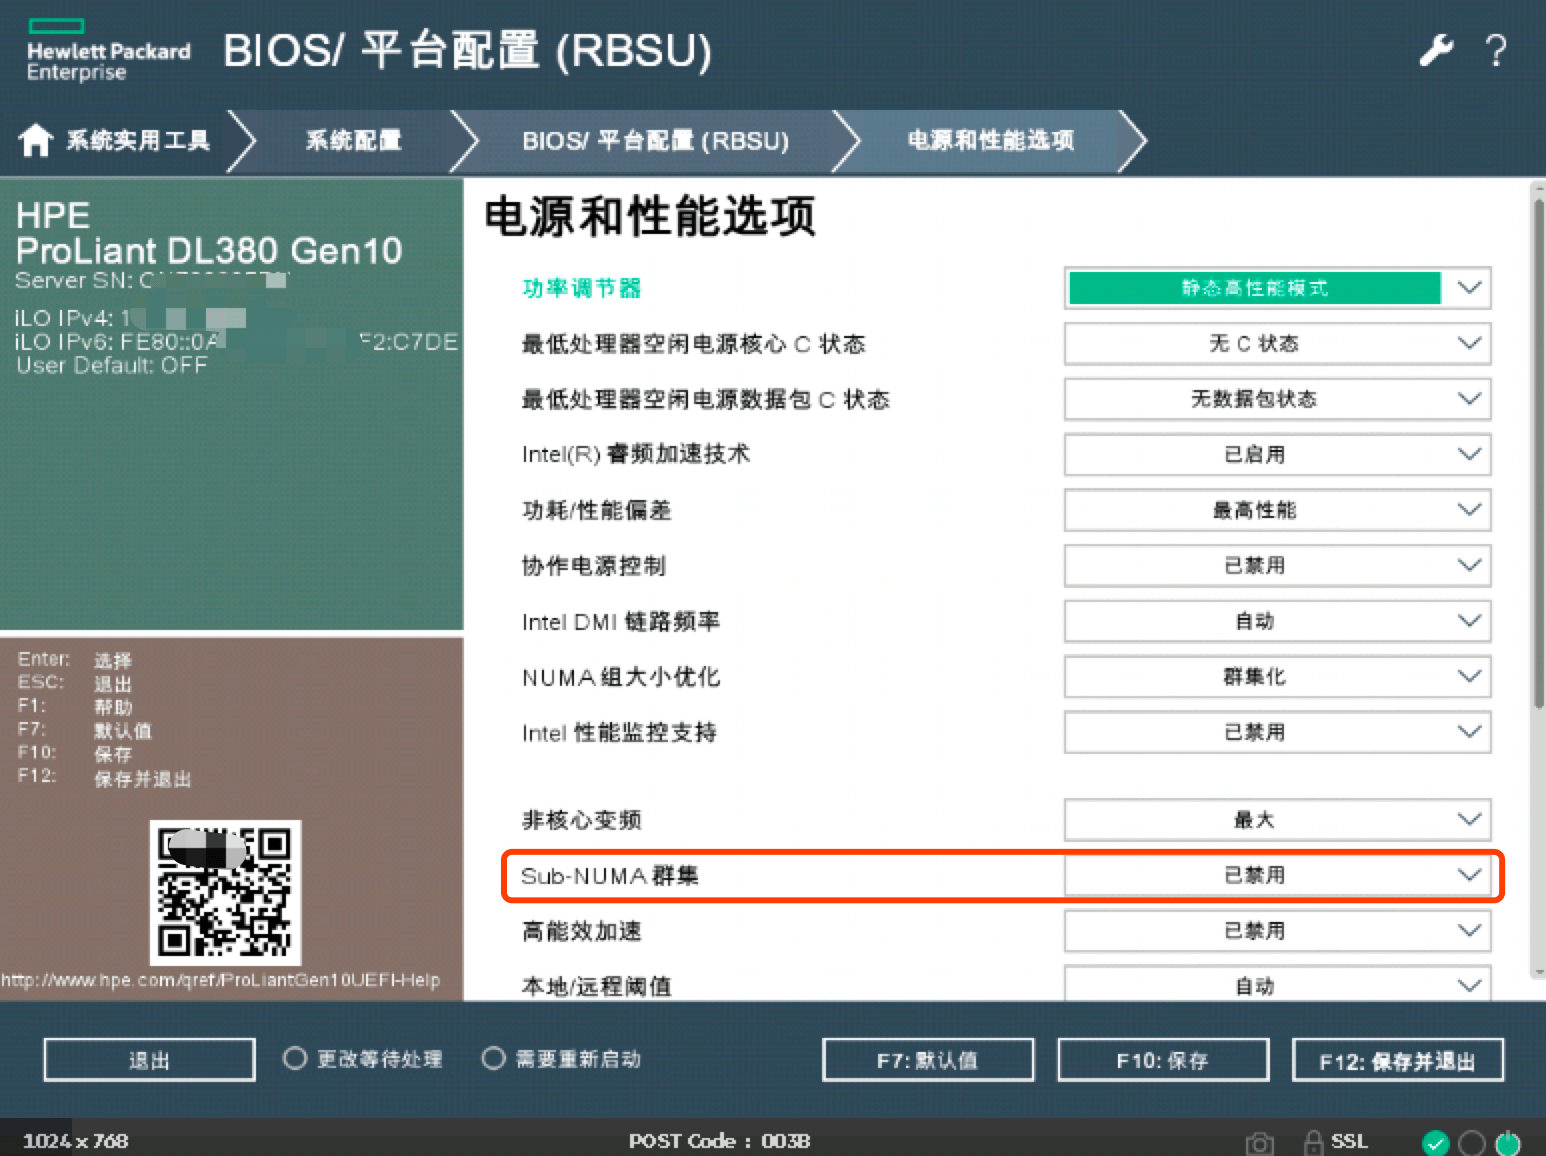
HPE服务器开启numa平衡4个numa节点(Sub Numa群集)
开启Sub Numa群集系统内会显示4个numa节点,如下图:

BiOS开启界面如下(Sub-NUMA群集启用后系统内会显示如上图的4个节点):

ilorest方式:
- #查看:
- ilorest get SubNumaClustering --selector=Bios. -u admin -p xxxxxx --url=10.x.x.x
- #开启:
- ilorest set SubNumaClustering=Enabled --selector=Bios. -u admin -p xxxxxx --url=10.x.x.x
- #关闭:
- ilorest set SubNumaClustering=Disabled --selector=Bios. --commit -u admin -p xxxxxx --url=10.x.x.x
redfish方式:
- #查看:
- curl -s -X GET -k -H 'Content-Type: application/json' https://10.x.x.x/redfish/v1/systems/1/bios/settings/ -u admin:xxxxxx --insecure | json_reformat |grep -i 'SubNumaClustering'
- #开启:
- curl -X PATCH -k -H 'Content-Type: application/json' -i https://10.x.x.x/redfish/v1/systems/1/bios/settings/ --data '{"Attributes": {"SubNumaClustering":"Enabled"}}' -u admin:xxxxxx --insecure
- #关闭:
- curl -X PATCH -k -H 'Content-Type: application/json' -i https://10.x.x.x/redfish/v1/systems/1/bios/settings/ --data '{"Attributes": {"SubNumaClustering":"Disabled"}}' -u admin:xxxxxx --insecure


